Unity项目的CSharp程序集划分及其目标编译平台
用Editor打开Unity项目时会编译其内所有CSharp脚本为DLL到其Library目录下,本文研究如何在命令行中完成该过程,以及如何在该过程中更改编译的目标平台
Unity项目的CSharp程序集划分及其目标编译平台
一、两类程序集
1.1 预定义程序集
1.1.1 目录职能
- 在一个Unity项目的根目录下,几个特殊子目录职能如下
Assets/目录(纳入版本管理)- 存放包括CSharp脚本在内的各种游戏资产,包括各种CSharp脚本
Packages/目录(纳入版本管理)- 存放各种独立功能包,可以是从插件缓存目录
Library/PackageCache/中拷贝到此处的进行功能定制覆写的插件源码,也可以是自己写的某些独立模块 - 每个
Package一般都会被编译到一个独立程序集内,其DLL文件名等属性由其对应的.asmdef配置文件进行定义,详见后文自定义程序集相关
- 存放各种独立功能包,可以是从插件缓存目录
Library/ScriptAssemblies/目录(不纳入版本管理的临时目录)- 存放各种编译后的DLL程序集产物
1.1.2 编译顺序
- Unity会根据CSharp脚本文件在项目文件夹结构中的位置,以如下四个阶段编译脚本得到DLL产物(每一阶段的程序集可以引用其上方已生成的DLL,但不能引用下方的)
- 第一阶段:
Assembly-CSharp-firstpass.dll- 目标是位于名为
Standard Assets(仅在Assets根文件夹中有效)、Pro Standard Assets、Plugins的文件夹中,且不位于名为Editor的子文件夹中的全部所谓运行时脚本(即除去其内的其它脚本) - 基础依赖层,通常存放第三方的SDK、底层插件、或是不常修改的工具类,这些代码通常非常庞大且稳定,当修改了游戏逻辑代码时只需重编后面的主程序集等,减少了编译时间
- 目标是位于名为
- 第二阶段:
Assembly-CSharp-Editor-firstpass.dll- 目标是位于名为
Standard Assets、Pro Standard Assets、Plugins的文件夹中,且位于任意位置下的名为Editor的文件夹中的全部所谓编辑器脚本 - 专门为插件配套的编辑器工具脚本,能引用第一阶段的相关代码,但不能引用主程序集,保证了插件的独立性
- 目标是位于名为
- 第三阶段:
Assembly-CSharp.dll- 目标是不位于名为
Editor的文件夹中的所有其他脚本 - 主程序集,承载具体的核心游戏逻辑(如角色控制、UI系统、关卡流程等),无法访问编辑器扩展程序集,因为游戏在真机上运行时不需要Unity编辑器工具
- 目标是不位于名为
- 第四阶段:
Assembly-CSharp-Editor.dll- 目标是位于名为
Editor的文件夹中的所有其它脚本 - 编辑器扩展,存放如自动打包脚本、资源导入处理脚本等工具实现,该程序集不入包
- 目标是位于名为
- 第一阶段:
1
2
3
4
5
6
7
UnityProject/
└── Library/ScriptAssemblies/
    ├── Assembly-CSharp-firstpass.dll
    ├── Assembly-CSharp-Editor-firstpass.dll
    ├── Assembly-CSharp.dll
    ├── Assembly-CSharp-Editor.dll
    └── 其它自定义程序集
1.2 自定义程序集
1.2.1 ADF文件
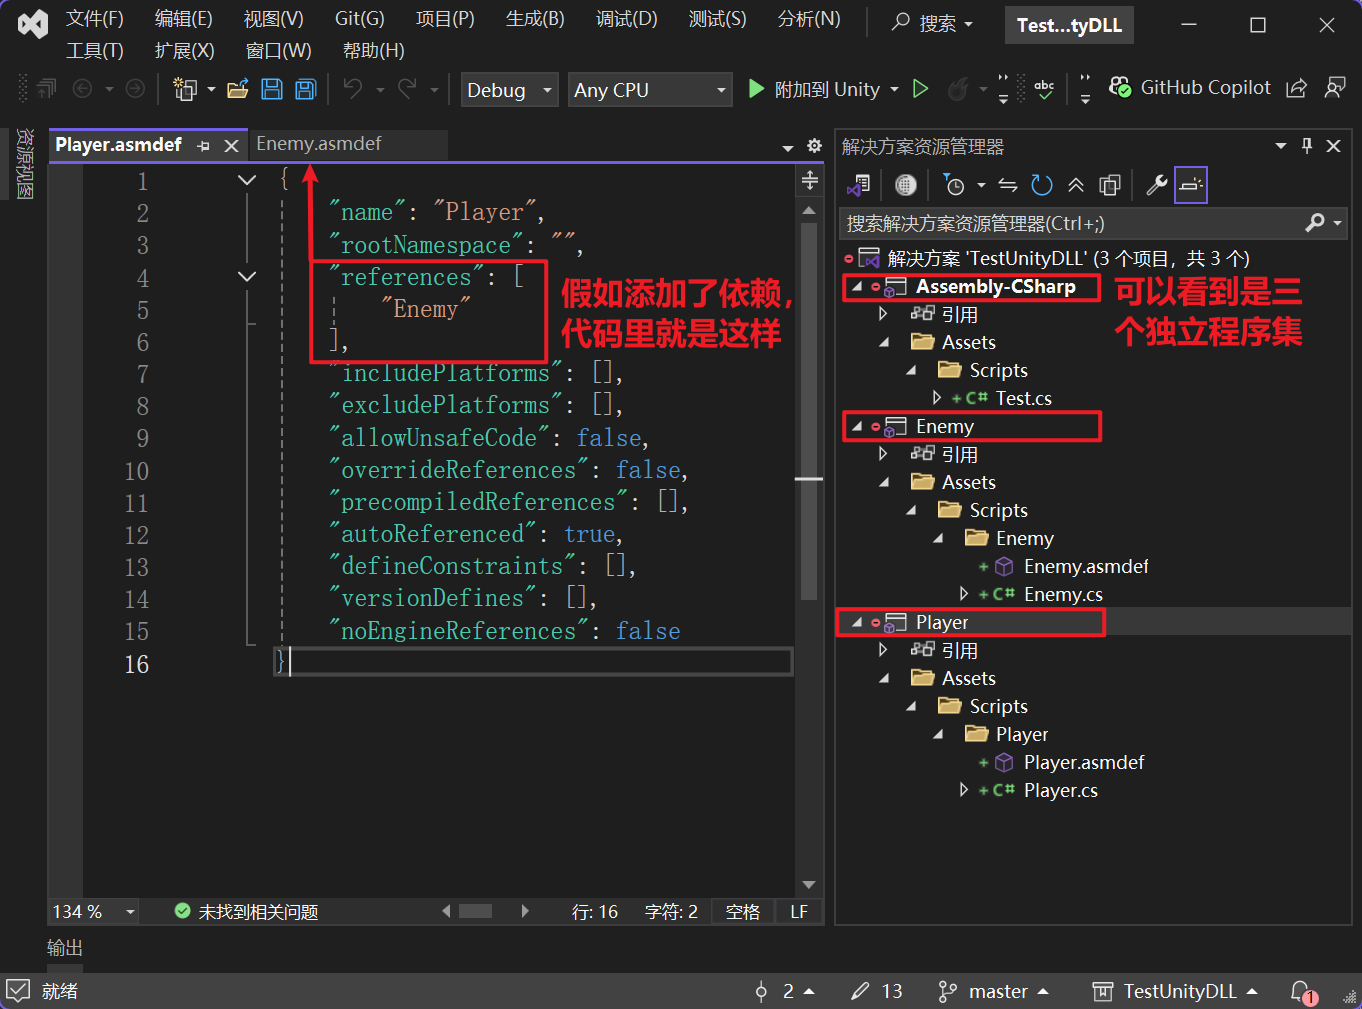
- 在Unity资源管理器中右键选择
Create -> Assembly Definition可创建ADF程序集定义文件.asmdef- ADF文件所在目录下的全部CSharp脚本都会被编译进一个独立DLL程序集内,程序集的名称无关乎ADF所在的文件夹名或ADF的文件名,只跟ADF文件中的Name属性有关
- 其目的在于拆分各个功能模块组织为单独的程序集,并通过定义明晰的依赖关系,确保脚本更改后只会重新生成必需的程序集,减少编译时间
- 例如在
Assets目录下(同样适用于根目录下Packages文件夹内的各包)创建若干.asmdef文件,那么其所在目录的所有CSharp脚本都纳入该程序集
1
2
3
4
5
6
7
8
UnityProject/Assets/
└── Scripts/
    ├── Player/
    │   ├── Player.cs
    │   └── Player.asmdef
    └── Enemy/
        ├── Enemy.cs
        └── Enemy.asmdef

- 可以看到在VS内区分了各程序集,各对应一个
.csproj,若没有则可删掉.sln让Unity刷新一下解决方案
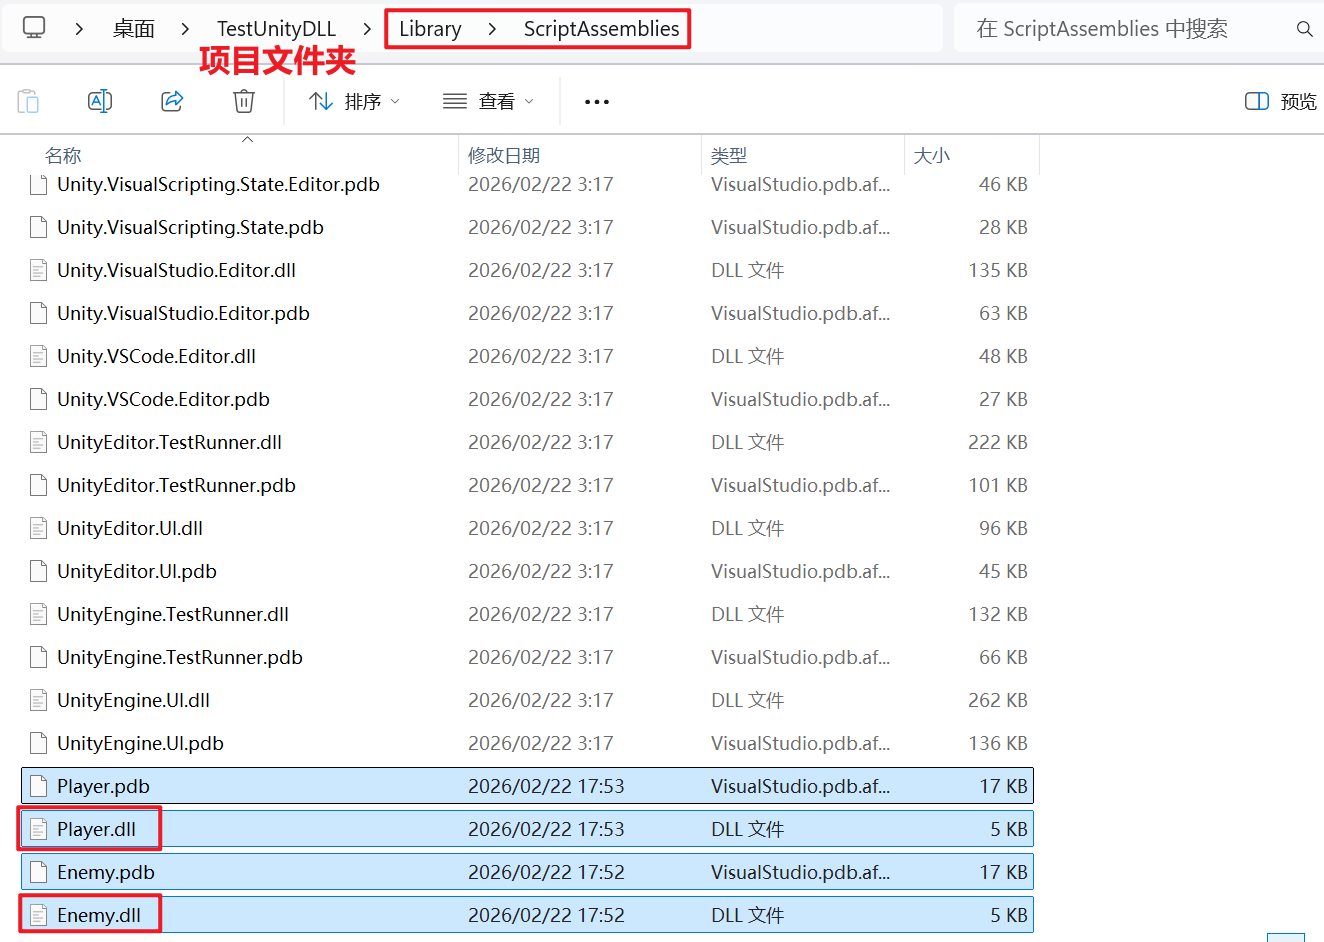
1.2.2 DLL产物
- 名称字段为
XXX的ADF文件对应的产物存放在项目根目录下的Library/ScriptAssemblies/XXX.dll位置
1.2.3 编译顺序
- 一旦在文件夹中创建了ADF文件,该文件夹下的脚本就会从Unity的预定义程序集编译流程中剥离出来,即忽略了那些特殊文件夹名的规则
- Unity会分析所有ADF程序集间的引用关系,没有任何依赖的程序集最先编译,被依赖的程序集总是在使用者之前完成编译
- 如果自定义程序集的平台选项只勾选了
Editor平台,则属于编辑器自定义程序集(只在Unity编辑器下运行而不入包),否则属于运行时自定义程序集- 编辑器自定义程序集:通常与
Assembly-CSharp-Editor.dll处于同一阶段,谁先谁后则取决于依赖关系 - 运行时自定义程序集:通常在
Assembly-CSharp-firstpass.dll之后、Assembly-CSharp.dll主程序集之前编译
- 编辑器自定义程序集:通常与
二、按平台编译
参考Unity Editor command line arguments、Conditional Compilation
2.1 例程准备
- 新建一个空白项目,创建
Assets/Test/目录,并在其内新建Test.asmdef与Test.cs文件,后者写入如下内容,其将会被编入Library/ScriptAssemblies/Test.dll内
1
2
3
4
5
6
7
8
9
10
11
12
13
14
15
16
17
18
19
20
21
22
23
24
25
26
27
28
using System.Collections;
using System.Collections.Generic;
using UnityEngine;

public class Test : MonoBehaviour
{
    void Start()
    {
#if UNITY_EDITOR
        Debug.Log("UNITY_EDITOR");
#endif
#if UNITY_IOS
        Debug.Log("UNITY_IOS");
#endif
#if UNITY_ANDROID
        Debug.Log("UNITY_ANDROID");
#endif
#if UNITY_STANDALONE_WIN
        Debug.Log("UNITY_STANDALONE_WIN");
#endif
#if UNITY_STANDALONE_OSX
        Debug.Log("UNITY_STANDALONE_OSX");
#endif
#if UNITY_WEBGL
        Debug.Log("UNITY_WEBGL");
#endif
    }
}
2.2 问题发现
- 如下脚本的作用是在CI/CD流水线(远程构建机)上通过Unity编辑器静默启动Unity项目,这会触发项目中所有CSharp脚本的编译,产出DLL程序集产物
1
2
3
4
5
6
7
8
9
10
11
12
13
14
15
16
17
18
19
20
21
22
23
24
25
26
27
28
29
30
31
32
33
34
35
36
37
38
39
40
41
42
43
44
45
46
47
48
49
50
51
52
53
54
55
56
57
58
59
60
61
62
63
64
65
66
67
68
69
70
71
72
73
74
75
76
77
78
79
import subprocess
import traceback
import os
import time

def main():
    # Unity编辑器可执行文件位置,以及目标项目位置
    UnityExePath = "D:/UNITY/Editor/2022.3.48f1c1/Editor/Unity.exe"
    ClientPath = "D:/Desktop/TestUnityDLL"

    # 日志的输出目录
    workFolder = os.path.join(ClientPath, "Build", "Logs")
    if not os.path.exists(workFolder):
        os.makedirs(workFolder)
    logPath = os.path.join(workFolder, "OpenProject.log")

    # 用Unity编辑器打开目标项目,编译其所依赖的DLL文件到根目录的Library/ScriptAssemblies/目录下
    command = [
        UnityExePath, # Unity编辑器可执行文件
        "-projectPath", ClientPath, # 指定Unity项目
        "-quit", # Unity完成任务后自动退出
        "-batchmode", # 无需人工交互的批处理模式,必须配合-quit使用
        "-nographics", # 无图形界面模式,节省内存和启动时间
        "-logFile", logPath, # 将Unity日志输出到指定文件
    ]

    # 应用上述命令
    callUnity = CallUnity()
    result_code = callUnity.execute_unity_method(command, logPath)
    if result_code == 0:
        print("[INFO] Task succeeded")
    else:
        print(f"[INFO] Task failed: {result_code}")
        exit(-1)

class CallUnity:
    # 返回0表示成功,非0表示失败
    def execute_unity_method(self, cmd: list, log_path: str):
        print(f"[INFO] 执行命令: {' '.join(cmd)}")
        # 清理旧的日志文件
        if os.path.exists(log_path):
            os.remove(log_path)
        # 开始启动Unity项目
        process = None
        last_line_count = 0
        try:
            # 启动Unity进程(批处理模式,无图形界面)
            process = subprocess.Popen(cmd)
            # 实时监控Unity日志文件,显示编译进度
            while process.poll() is None: # 进程还在运行
                if os.path.exists(log_path):
                    try:
                        with open(log_path, 'r', encoding='utf-8', errors='ignore') as f:
                            lines = f.readlines()
                            # 只输出新增的日志行
                            if len(lines) > last_line_count:
                                new_lines = lines[last_line_count:]
                                for line in new_lines:
                                    # 过滤并显示编译相关的关键信息
                                    if any(keyword in line for keyword in ['Compiling', 'Assembly', 'Library', 'dll']):
                                        print(f"[COMPILE] {line.strip()}")
                                last_line_count = len(lines)
                    except Exception:
                        pass
                time.sleep(1) # 每秒检查一次
            # 等待进程完全结束,获取返回码
            process.wait()
            return process.returncode
        except Exception as e:
            print(f"[INFO] Task exception: {e}")
            traceback.print_exc()
            return -1
        finally:
            # 确保进程被正确清理
            if process and process.poll() is None:
                process.kill()

if __name__ == "__main__":
    main()
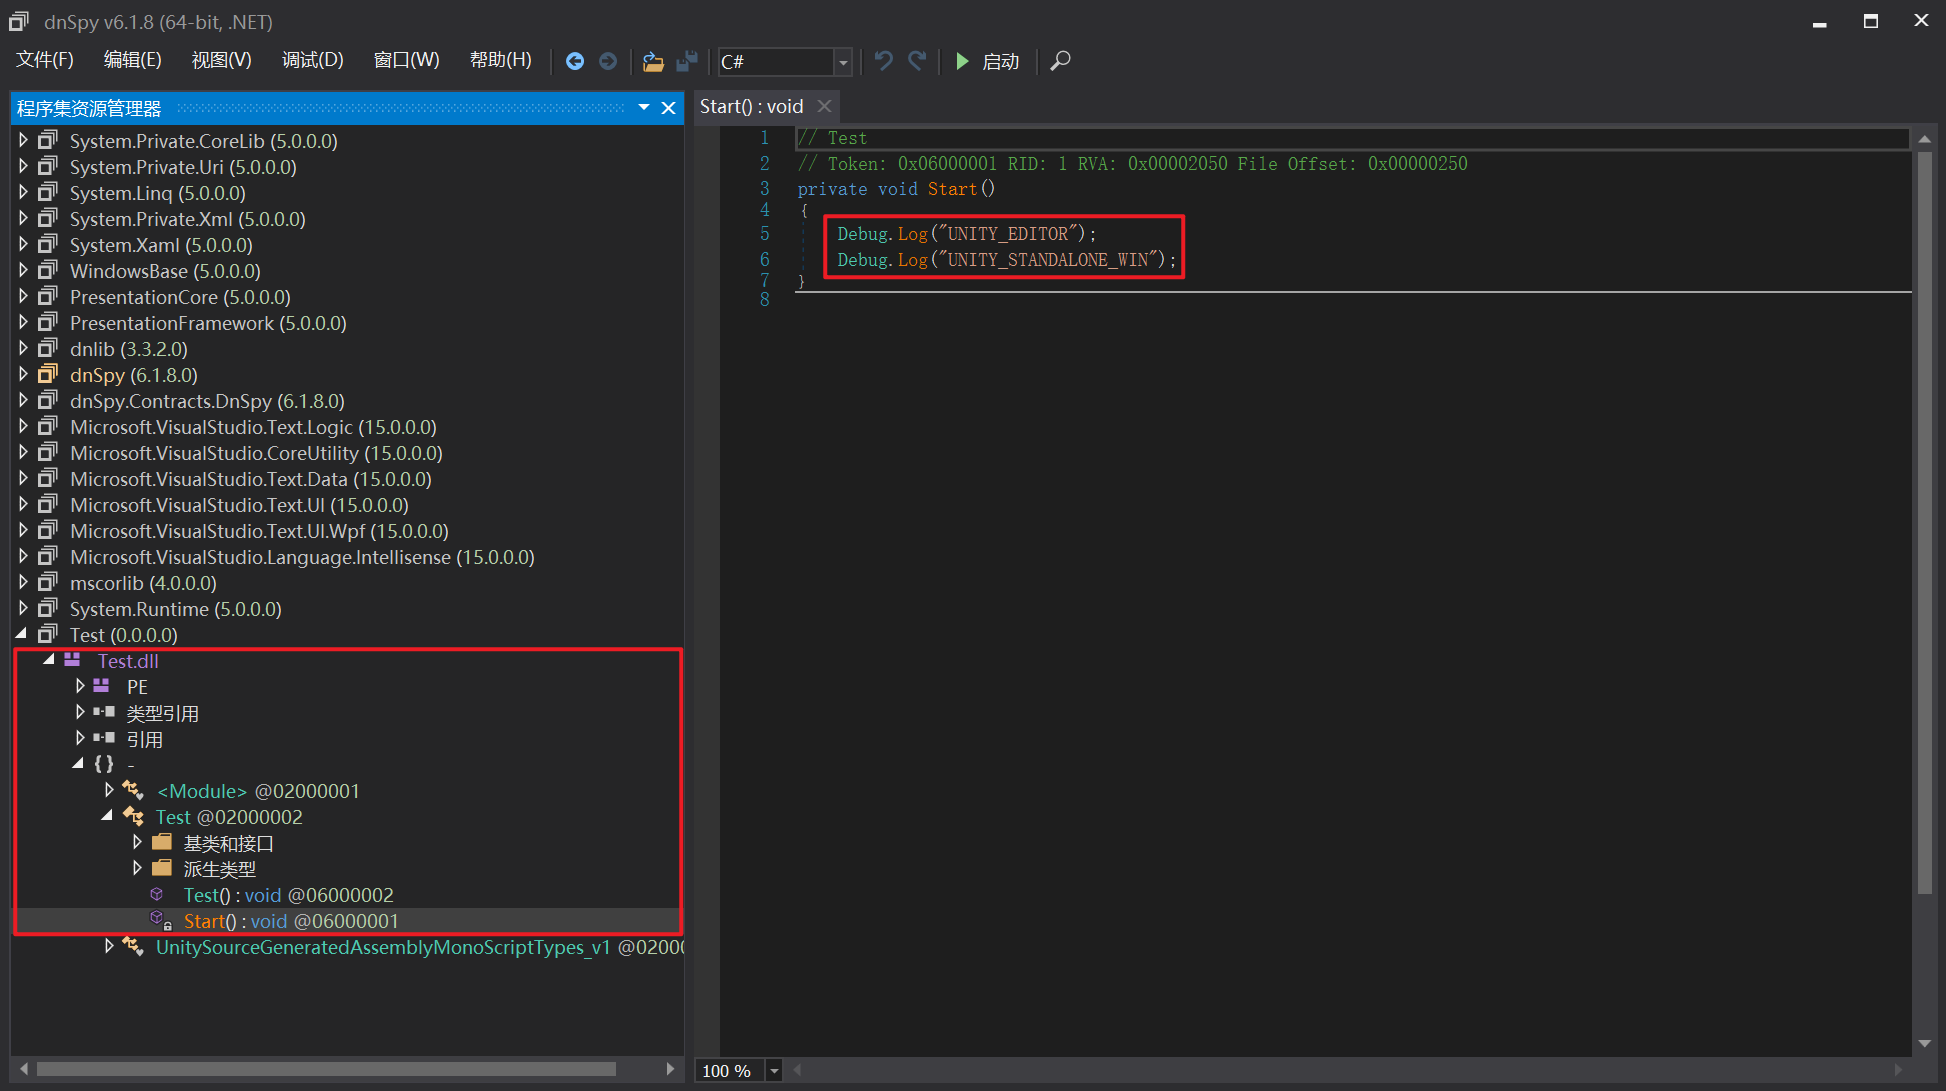
- 运行上述脚本编译完成后,通过dnSpy工具查看
Test.dll的Test.Start方法内容如下(手动通过Unity编辑器打开项目得到的结果相同),这是因为我的开发环境是Windows
1
2
3
4
5
6
7
// Test
// Token: 0x06000001 RID: 1 RVA: 0x00002050 File Offset: 0x00000250
private void Start()
{
	Debug.Log("UNITY_EDITOR");
	Debug.Log("UNITY_STANDALONE_WIN");
}
- 如果我想让
Test.dll中的条件编译走其它平台如UNITY_IOS,则通过新增启动命令参数-buildPlatform是无用的,因为这个参数控制的是游戏出包的平台,而不控制Library/ScriptAssemblies/下的DLL产物
2.3 问题解决
- 为了让条件编译走我们预期的平台分支,可通过Unity命令行的
-executeMethod参数,在项目打开后调用一个方法(即在Editor/特殊文件夹下新增的一个CSharp脚本内的静态方法)进行平台切换,然后再用新的平台参数进行DLL编译,新建的Assets/Editor/BuildHelper.cs如下,其检测Python脚本传入的-targetPlatform获取目标平台并进行切换- 由于在CI/CD批处理模式执行该脚本的过程中,通过
EditorUserBuildSettings.SwitchActiveBuildTarget方法(参考官方文档)完成平台切换后无法立刻生效(但是平台信息会被缓存到本地) - 这是因为需要删除原本DLL后(即
Library/ScriptAssemblies/目录下的全部文件,包括当前正在执行的脚本DLL)再重新打开项目时,Unity才会按照缓存的新平台信息重新编译DLL - 所以Python脚本必须在第一次打开Unity项目完成平台切换后就直接结束,然后删除全部DLL缓存,再重新打开目标项目触发编译,此时编译出的DLL走的才会是新平台的条件编译分支
- 由于在CI/CD批处理模式执行该脚本的过程中,通过
1
2
3
4
5
6
7
8
9
10
11
12
13
14
15
16
17
18
19
20
21
22
23
24
25
26
27
28
29
30
31
32
33
34
35
36
37
38
39
40
41
42
43
44
45
46
47
48
49
50
51
52
53
54
55
56
57
58
59
60
61
62
63
64
65
66
67
68
69
70
71
72
73
74
using UnityEditor;
using UnityEditor.Build;
using UnityEditor.Compilation;
using UnityEngine;
using System;
using System.IO;

public class BuildHelper : Editor
{
    // 切换构建平台并强制重新编译程序集
    public static void SwitchPlatform()
    {
        // 从命令行参数-targetPlatform获取目标平台
        string targetPlatform = null;
        string[] args = Environment.GetCommandLineArgs();
        for (int i = 0; i < args.Length; i++)
        {
            if (args[i] == "-targetPlatform" && i + 1 < args.Length)
            {
                targetPlatform = args[i + 1];
                break;
            }
        }
        BuildTarget target = BuildTarget.NoTarget;
        switch (targetPlatform.ToLower())
        {
            case "ios":
                target = BuildTarget.iOS;
                break;
            case "android":
                target = BuildTarget.Android;
                break;
            case "win":
                target = BuildTarget.StandaloneWindows64;
                break;
            case "osx":
                target = BuildTarget.StandaloneOSX;
                break;
            case "webgl":
                target = BuildTarget.WebGL;
                break;
            default:
                Debug.LogError($"[SwitchPlatform] Unsupported platform: {targetPlatform}");
                EditorApplication.Exit(1);
                return;
        }

        // 切换到目标平台
        if (EditorUserBuildSettings.activeBuildTarget != target)
        {
            Debug.Log($"[SwitchPlatform] Switching build target from {EditorUserBuildSettings.activeBuildTarget} to {target}");

            // 切换平台
            bool success = EditorUserBuildSettings.SwitchActiveBuildTarget(
                BuildPipeline.GetBuildTargetGroup(target),
                target
            );
            if (!success)
            {
                Debug.LogError($"[SwitchPlatform] Failed to switch to {target}");
                EditorApplication.Exit(1);
                return;
            }
            Debug.Log($"[SwitchPlatform] Successfully switched to {target}");
        }
        else
        {
            Debug.Log($"[SwitchPlatform] Already on {target} platform, will recompile scripts");
        }

        // 方法退出
        EditorApplication.Exit(0);
    }
}
- 修改Python脚本如下(其调用,并使用Unity启动的自定义命令行参数
-targetPlatform传入平台代号)
1
2
3
4
5
6
7
8
9
10
11
12
13
14
15
16
17
18
19
20
21
22
23
24
25
26
27
28
29
30
31
32
33
34
35
36
37
38
39
40
41
42
43
44
45
46
47
48
49
50
51
52
53
54
55
56
57
58
59
60
61
62
63
64
65
66
67
68
69
70
71
72
73
74
75
76
77
78
79
80
81
82
83
84
85
86
87
88
89
90
91
92
93
94
95
96
97
98
99
100
101
102
103
104
105
106
import subprocess
import traceback
import os
import time
import shutil

def main():
    # Unity编辑器可执行文件位置,以及目标项目位置
    UnityExePath = "D:/UNITY/Editor/2022.3.48f1c1/Editor/Unity.exe"
    ClientPath = "D:/Desktop/TestUnityDLL"
    target_platform = "webgl" # ios、android、win、osx、webgl

    # 日志的输出目录
    workFolder = os.path.join(ClientPath, "Build", "Logs")
    if not os.path.exists(workFolder):
        os.makedirs(workFolder)
    logPath1 = os.path.join(workFolder, "SwitchPlatform.log")
    logPath2 = os.path.join(workFolder, "PostRecompile.log")

    # 用Unity编辑器打开目标项目,切换平台
    command_switch_platform = [
        UnityExePath, # Unity编辑器可执行文件
        "-projectPath", ClientPath, # 指定Unity项目
        "-quit", # Unity完成任务后自动退出
        "-batchmode", # 无需人工交互的批处理模式,必须配合-quit使用
        "-nographics", # 无图形界面模式,节省内存和启动时间
        "-logFile", logPath1, # 将Unity日志输出到指定文件
        "-executeMethod", "BuildHelper.SwitchPlatform", # 执行静态方法
        "-targetPlatform", target_platform, # 自定义参数,传递平台信息
    ]

    # 在切换平台后,重新编译项目所依赖的DLL文件到根目录的Library/ScriptAssemblies/目录下
    command_recompile = [
        UnityExePath,
        "-projectPath", ClientPath,
        "-quit",
        "-batchmode",
        "-nographics",
        "-logFile", logPath2,
    ]

    # 执行平台切换命令
    callUnity = CallUnity()
    result_code = callUnity.execute_unity_method(command_switch_platform, logPath1)
    if result_code == 0:
        print(f"[INFO] Task command_switch_platform succeeded for platform: {target_platform}")
        # 平台切换后,清理Library/ScriptAssemblies/缓存后重新编译
        scriptAssembliesPath = os.path.join(ClientPath, "Library", "ScriptAssemblies")
        if os.path.exists(scriptAssembliesPath):
            print(f"[INFO] Cleaning ScriptAssemblies cache: {scriptAssembliesPath}")
            shutil.rmtree(scriptAssembliesPath)
            print(f"[INFO] ScriptAssemblies cache cleaned successfully")
        # 重新编译DLL
        result_code = callUnity.execute_unity_method(command_recompile, logPath2)
        if result_code == 0:
            print(f"[INFO] Task command_recompile succeeded for platform: {target_platform}")
        else:
            print(f"[INFO] Task command_recompile failed: {result_code}")
            exit(-1)
    else:
        print(f"[INFO] Task command_switch_platform failed: {result_code}")
        exit(-1)

class CallUnity:
    # 返回0表示成功,非0表示失败
    def execute_unity_method(self, cmd: list, log_path: str):
        print(f"[INFO] Run command: {' '.join(cmd)}")
        # 清理旧的日志文件
        if os.path.exists(log_path):
            os.remove(log_path)
        # 开始启动Unity项目
        process = None
        last_line_count = 0
        try:
            # 启动Unity进程(批处理模式,无图形界面)
            process = subprocess.Popen(cmd)
            # 实时监控Unity日志文件,显示编译进度
            while process.poll() is None: # 进程还在运行
                if os.path.exists(log_path):
                    try:
                        with open(log_path, 'r', encoding='utf-8', errors='ignore') as f:
                            lines = f.readlines()
                            # 只输出新增的日志行
                            if len(lines) > last_line_count:
                                new_lines = lines[last_line_count:]
                                for line in new_lines:
                                    # 过滤并显示编译相关的关键信息
                                    if any(keyword in line for keyword in ['Compiling', 'Assembly', 'Library', 'dll', 'SwitchPlatform']):
                                        print(f"[COMPILE] {line.strip()}")
                                last_line_count = len(lines)
                    except Exception:
                        pass
                time.sleep(0.1) # 每段时间检查一次
            # 等待进程完全结束,获取返回码
            process.wait()
            return process.returncode
        except Exception as e:
            print(f"[INFO] Task exception: {e}")
            traceback.print_exc()
            return -1
        finally:
            if process and process.poll() is None: # 确保进程被正确清理
                process.kill()

if __name__ == "__main__":
    main()
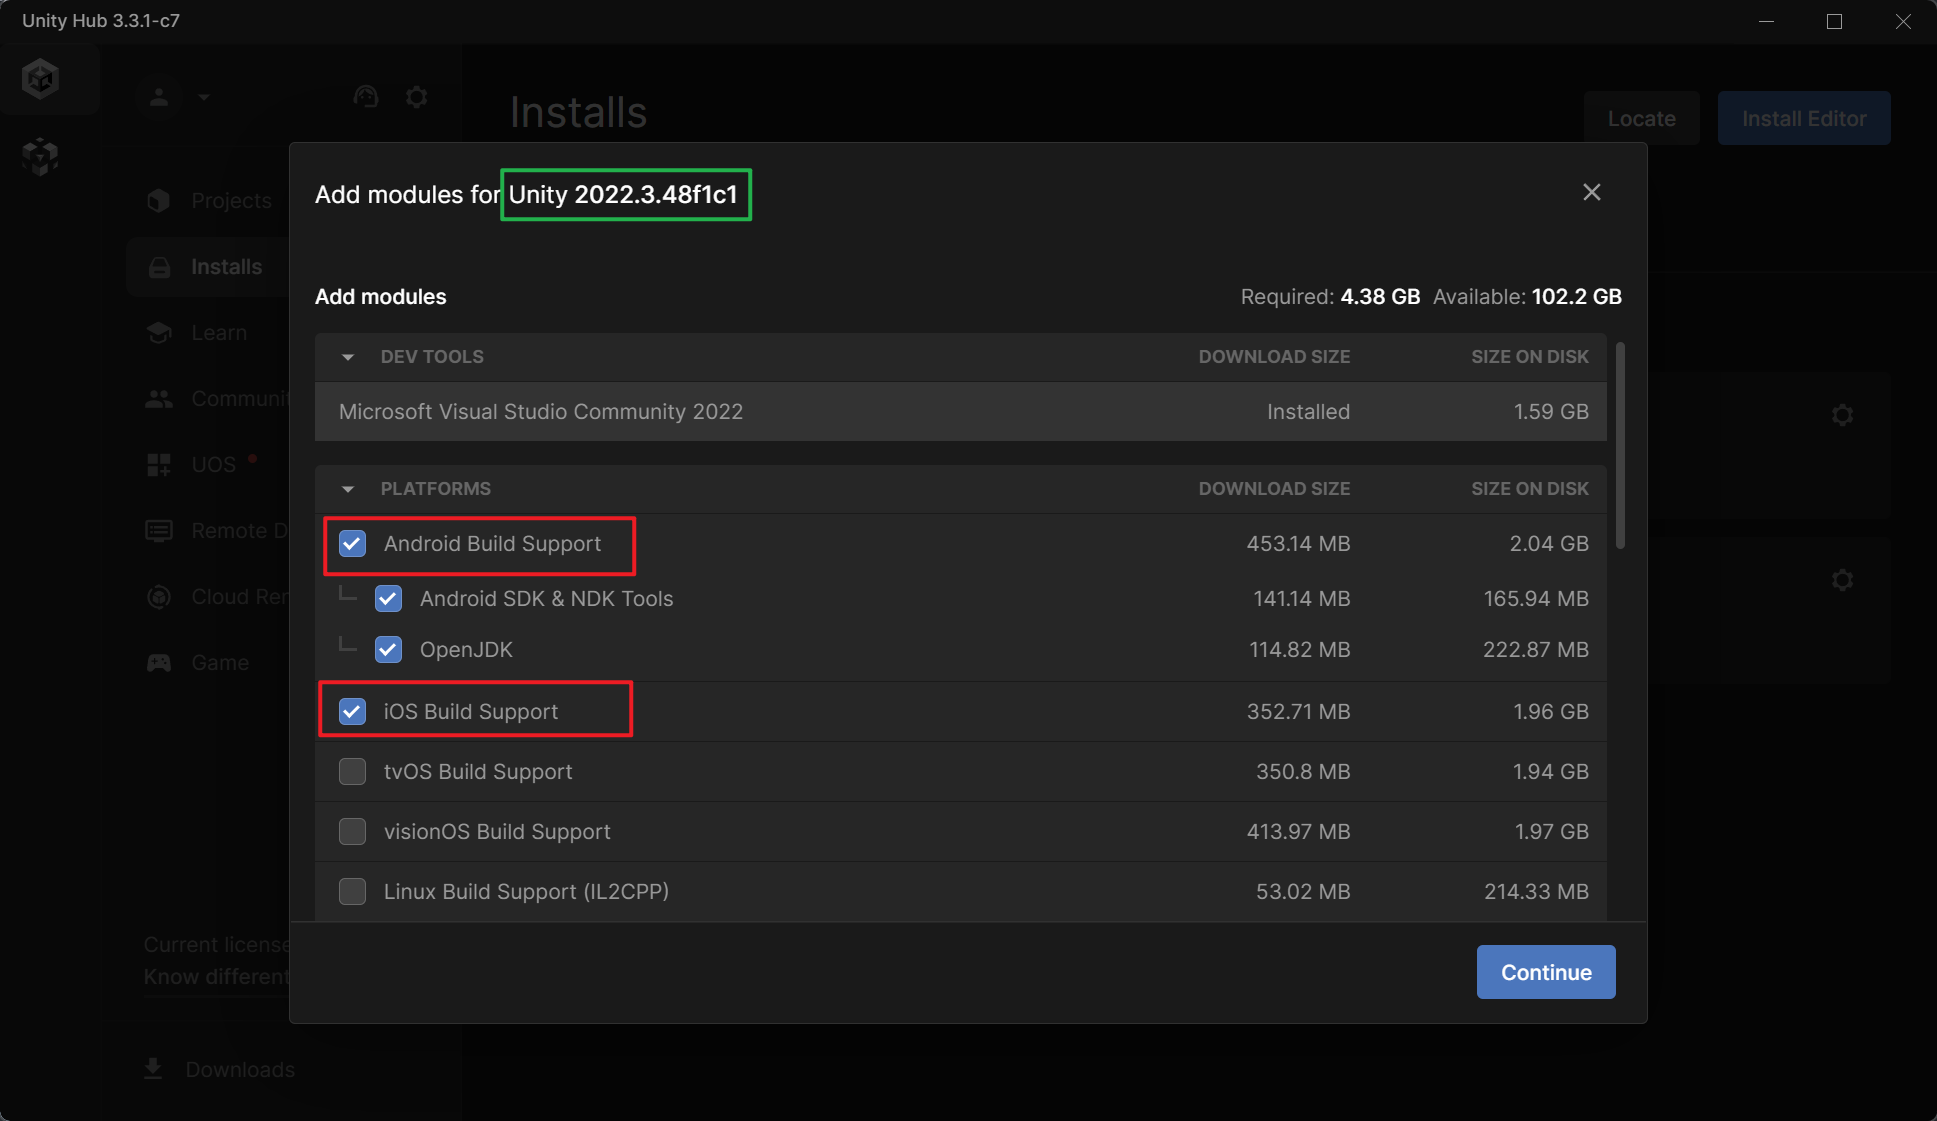
- 如果在测试iOS或Android等平台遇到类似如下报错,需检查是否为Unity编辑器安装了对平台的支持
1
2
3
4
5
6
7
[PLATFORM] [BuildHelper.SwitchPlatform] Switching build target from StandaloneWindows64 to Android
[PLATFORM] BuildHelper:SwitchPlatform () (at Assets/Editor/BuildHelper.cs:52)
[PLATFORM] (Filename: Assets/Editor/BuildHelper.cs Line: 52)
[PLATFORM] [BuildHelper.SwitchPlatform] Failed to switch to Android
[PLATFORM] BuildHelper:SwitchPlatform () (at Assets/Editor/BuildHelper.cs:62)
[PLATFORM] (Filename: Assets/Editor/BuildHelper.cs Line: 62)
[INFO] Task failed: 1
2.4 结果验证
2.4.1 验证平台配置
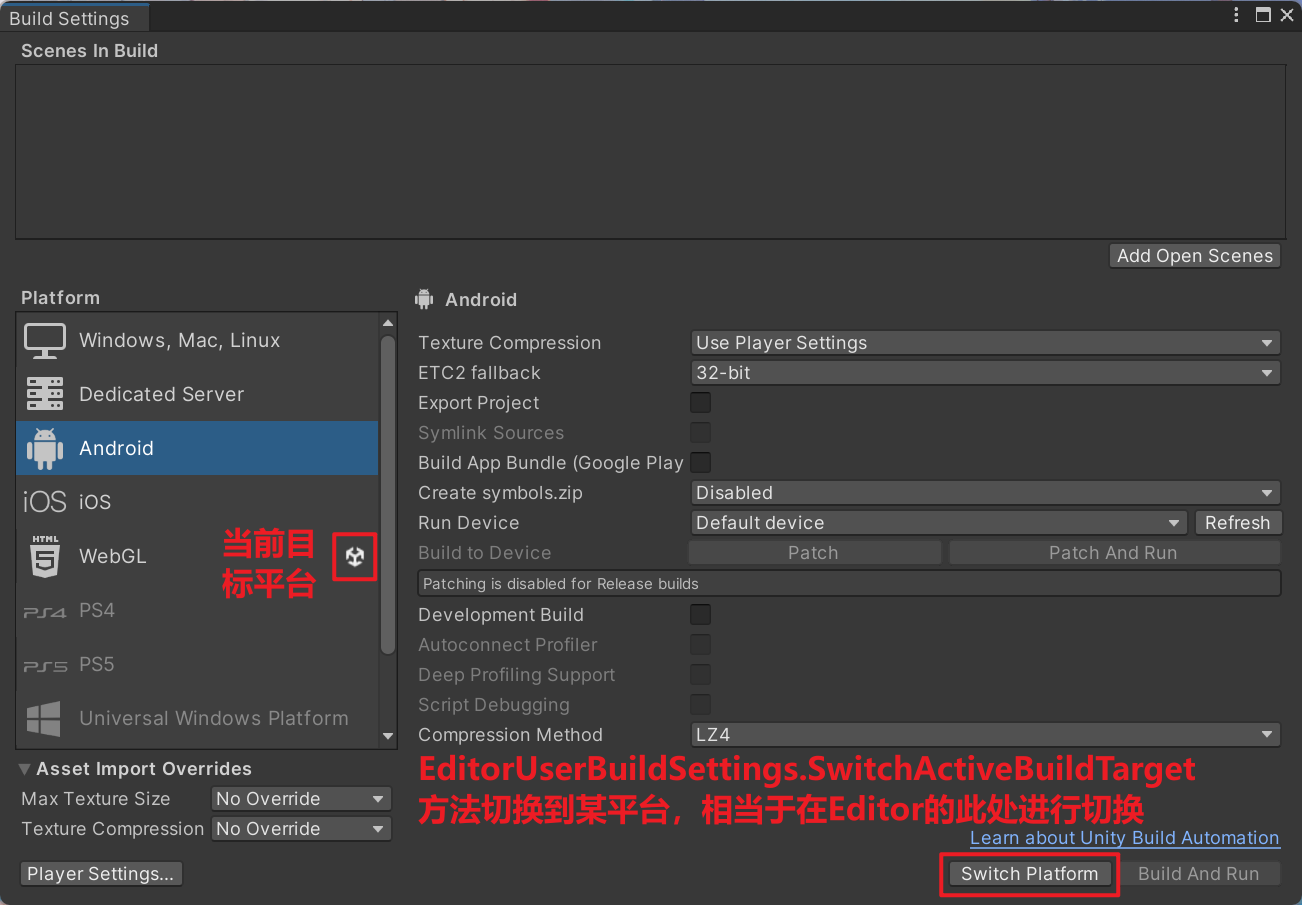
- 通过
EditorUserBuildSettings.SwitchActiveBuildTarget方法切换平台,相当于在Unity编辑器内通过File -> Build Settings内选择切换到目标平台
- 设置的平台信息保存在项目的
Library/EditorUserBuildSettings.asset二进制配置文件内,可通过Python的UnityPy库来解析其配置字段
1
2
3
4
5
6
7
8
9
10
11
12
13
14
15
16
17
18
19
20
21
22
23
24
25
26
27
28
29
30
31
32
33
import UnityPy
import sys

def parse_unity_config(filepath):
    try:
        # 加载文件
        env = UnityPy.load(filepath)
        # 遍历文件中的所有对象
        for obj in env.objects:
            print(f"\nFileType: {obj.type.name}")
            print(f"PathID: {obj.path_id}")
            # 尝试读取对象数据
            data = obj.read()
            # 打印对象的所有属性
            if hasattr(data, '__dict__'):
                print("Attributes:")
                for key, value in data.__dict__.items():
                    if not key.startswith('_'):
                        try:
                            print(f"  {key}: {value}")
                        except:
                            print(f"  {key}: <Unknown>")
    except Exception as e:
        print(f"Failed to parse: {e}")
        import traceback
        traceback.print_exc()

if __name__ == "__main__":
    if len(sys.argv) < 2:
        print("Usage: python this_script.py <path_to_file>")
        sys.exit(1)
    filepath = sys.argv[1]
    parse_unity_config(filepath)
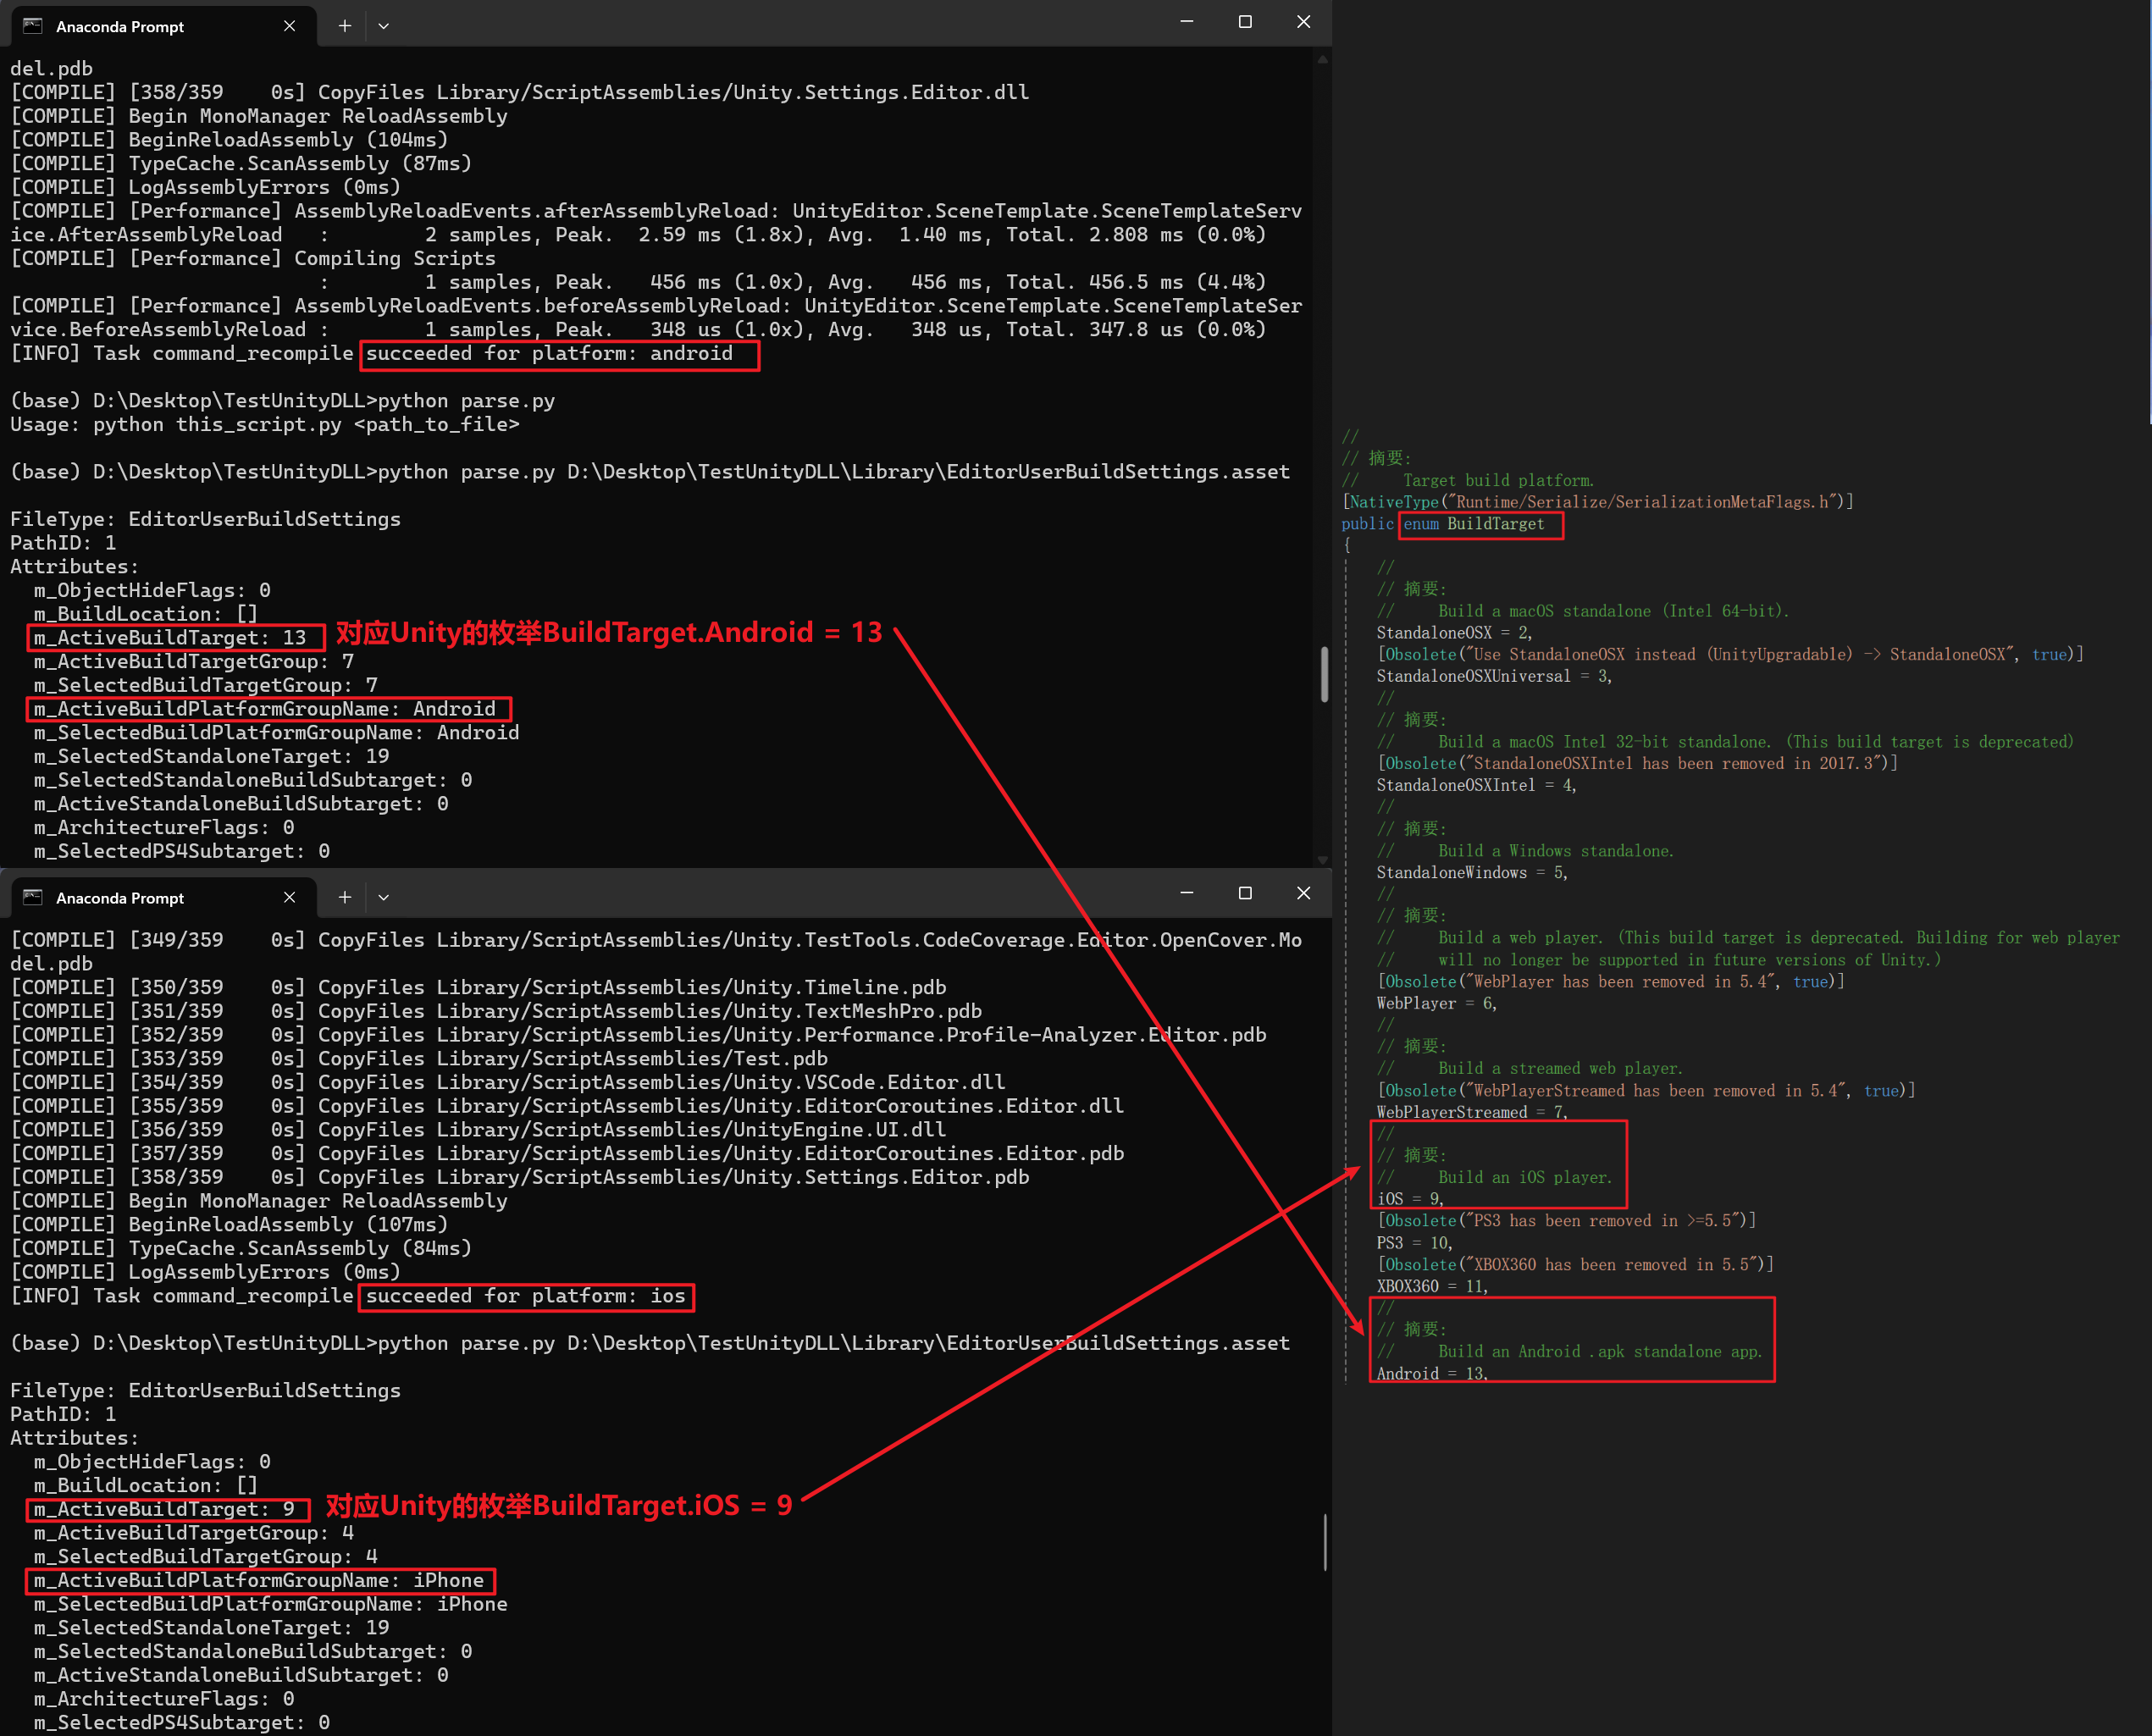
- 在虚拟环境
pip install UnityPy安装该工具包后,运行上述脚本即可解析配置文件,由官方API文档可知只要检查m_ActiveBuildTarget的值无误即可,我用前文的方法分别切换到Android和iOS平台后进行验证,发现平台信息的确是准确地被缓存到该配置文件内了
2.4.2 验证反编译DLL
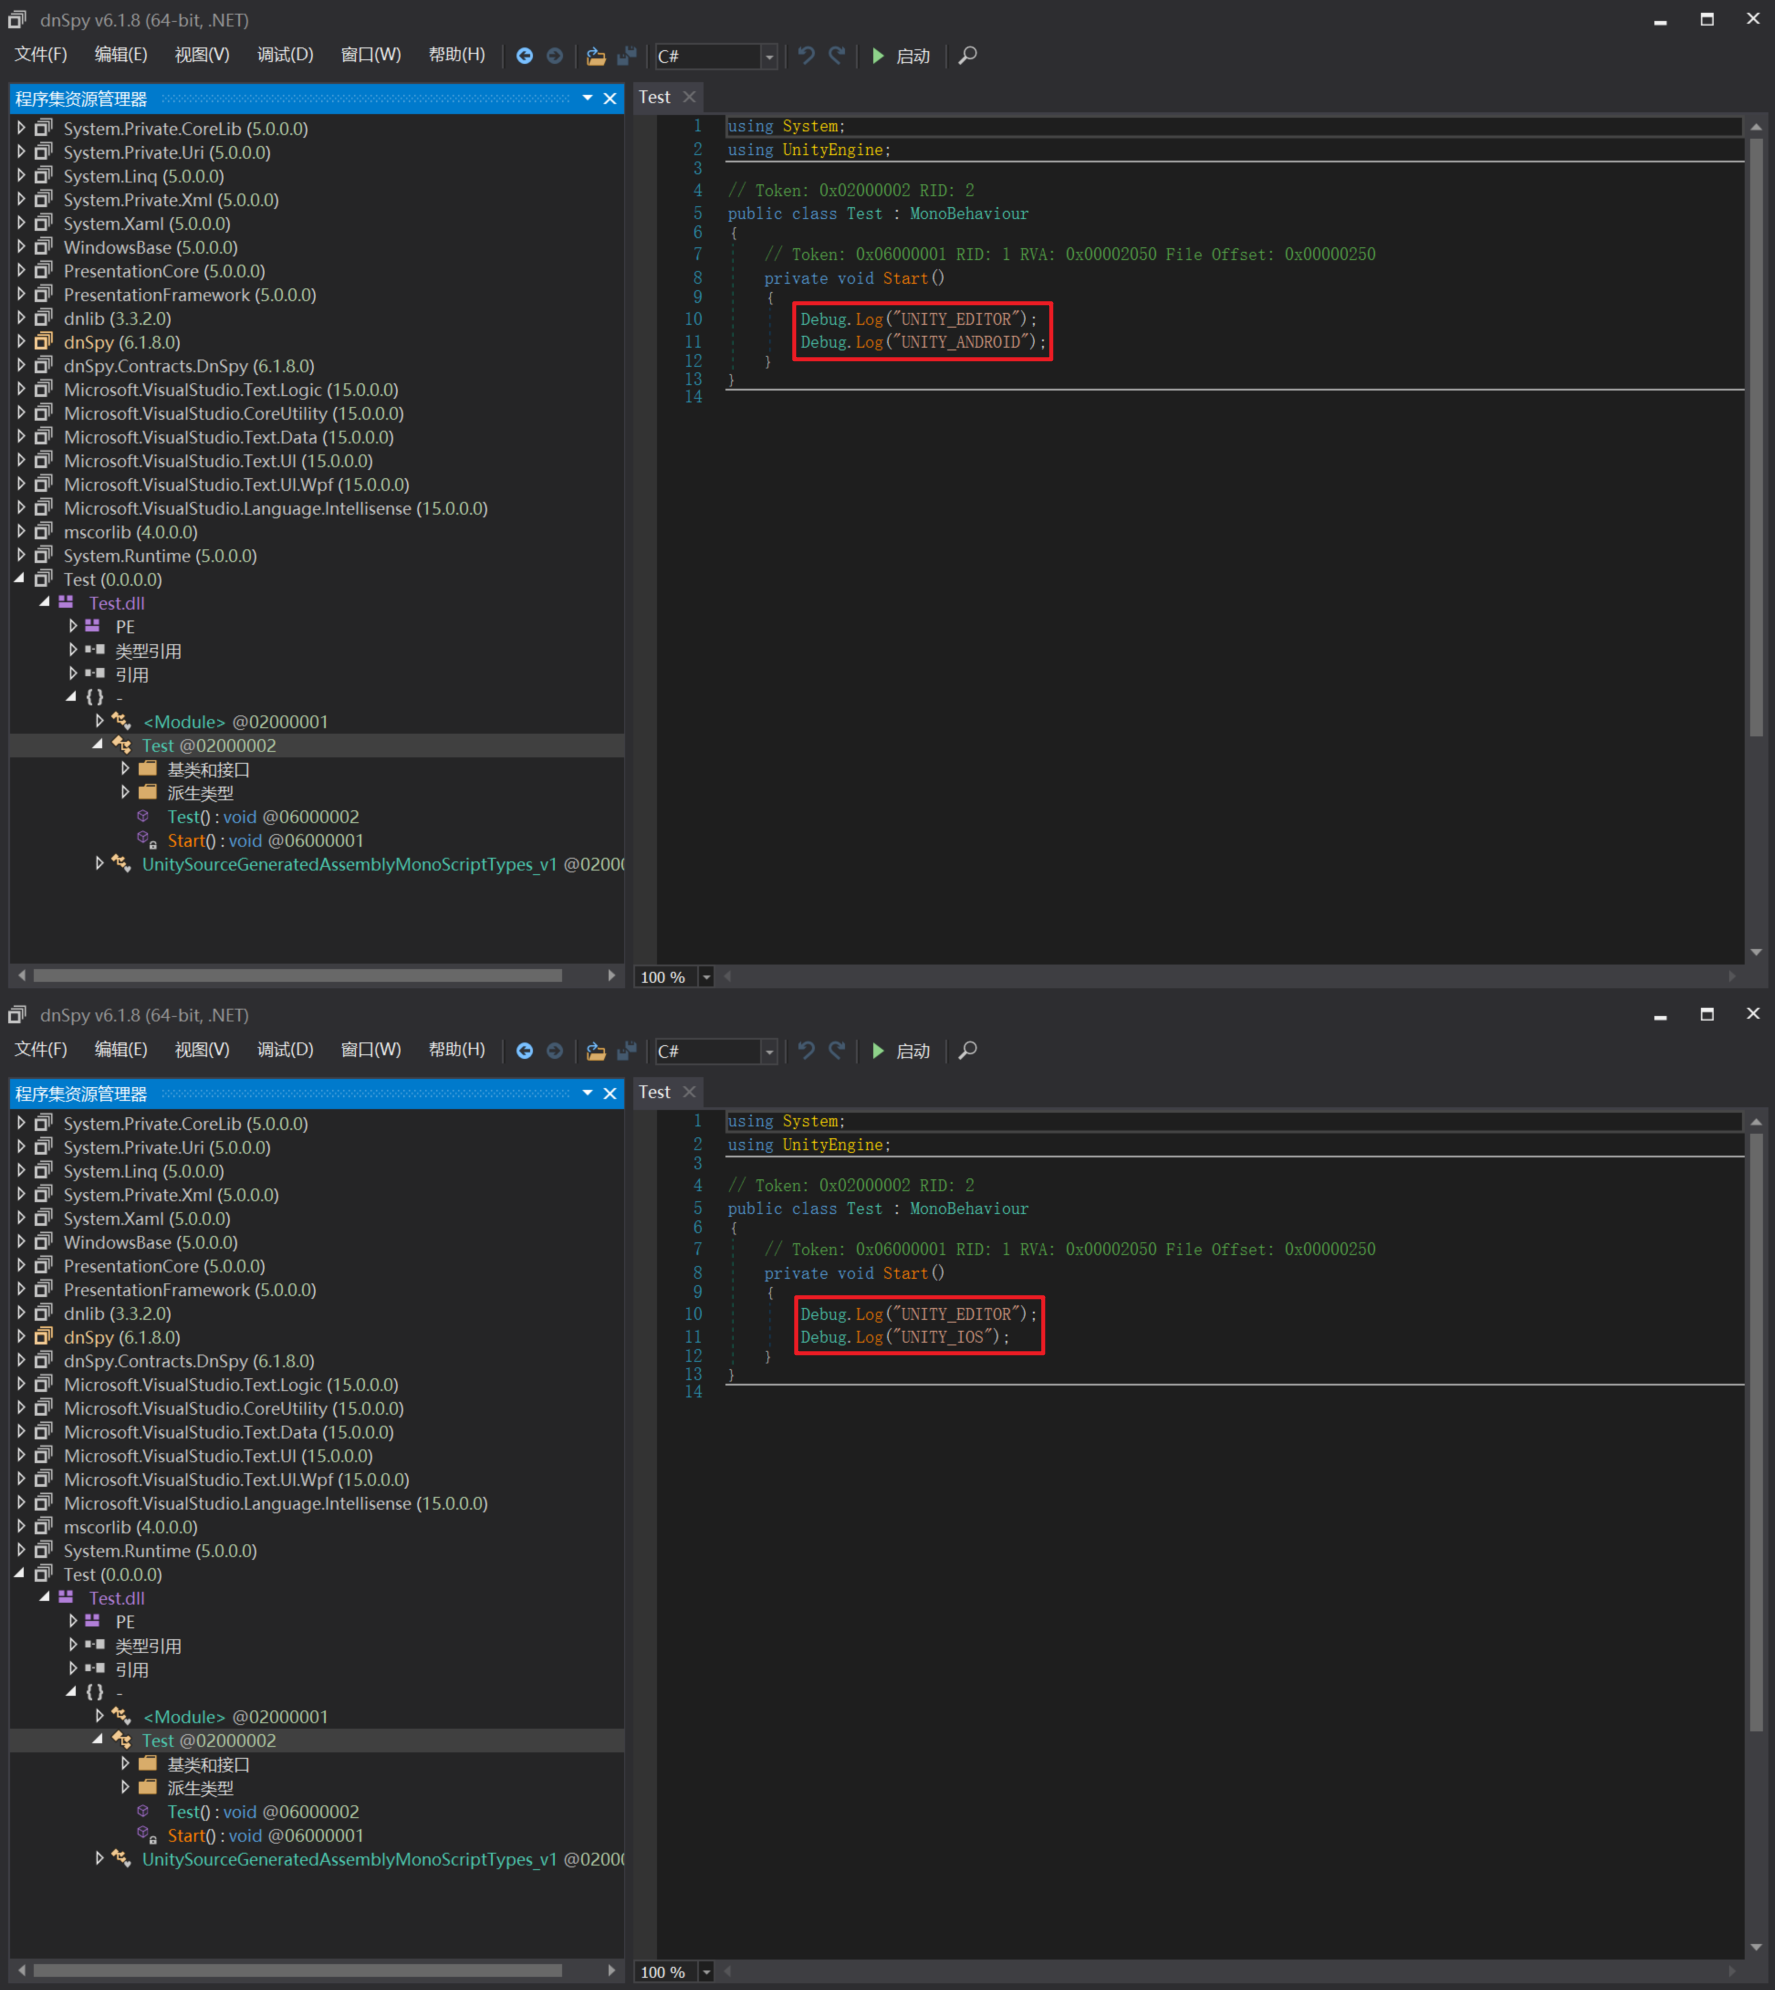
- 编译完成后,通过dnSpy工具检查
Test.dll文件的反编译代码,可发现如下图测试的iOS和Android平台的DLL反编译代码均正确符合预期(注意在测试切换平台编译时,需先把dnSpy内原先打开的Tesh.dll移除掉,再拖入新编译的产物进行查看,防止旧的内容残留而导致误判)
本文由作者按照 CC BY-NC-SA 4.0 进行授权